Showing posts with label eggs. Show all posts

Friday, April 29, 2011

Swiss Cheese Quiche With Ham and Butter Browned Onion Rings


Where do I come up with the names for these recipes?  Far reaching imagination. Possibility Thinking, my friends!  And the title does completely and thoroughly describe the deliciousness of this creation.  Here's how it happened.  A Marie Callender's frozen deep dish pie crust in the freezer, leftover spiral sliced ham from Easter Sunday. (You might ask, what is a nice Jewish girl like Singingirl doing with a ham in her refrigerator?  Answer, my Pianoman is a nice Irish boy....) Okay, pie crust, ham, a block of swiss cheese, fresh basil needing to be used.  Plus, I haven't posted a recipe in so long, I almost forgot my username and password.  If you have looked at one of my other recipes for quiche on the blog, you will see that the basic recipe for the custard remains pretty much the same, with a little tweaking here and there.  It's the extras that make each of them unique.  So, whether you like broccoli or cauliflower quiche, or if my newest creation appeals to you with deliciously browned onions, finely chopped, extra lean ham, and seasoned with fresh basil, one thing is clear. The possibilities are limitless for creating a perfect tasting quiche! Think of it and make it.  I did!

SWISS CHEESE QUICHE WITH HAM 
AND BUTTER BROWNED ONION RINGS
1 deep dish frozen pie crust (of course, you can make your own... but why!!??)
1 Tbs. dijon mustard
1 Tbs. butter
1 medium onion, thinly sliced
1 8 oz. block of swiss cheese, shredded
1/2 cup of finely chopped, lean ham (of course, my vegetarian friends can omit this)
1 Tbs. thinly sliced fresh basil (or use 1 tsp. of dried)
4 eggs
1 1/2 cups of milk (I used fat free, it works great)
3 level Tbs. of flour
Salt and pepper to taste
1/4 cup of grated Parmesan cheese

Preheat the oven to 375 degrees. Brush the bottom and sides of the pie crust with the dijon mustard and set aside.  In a small pan, melt the butter and season the onion rings with salt and pepper. Brown the onions on medium heat, stirring, until the onion rings are browned but not burnt and are nicely softened. Remove from heat and set aside for a moment.  Spread the shredded swiss over the bottom of the prepared pie crust. Distribute the finely chopped ham, browned onions and basil over the cheese.  In a separate bowl, combine the eggs, milk, flour, salt and pepper.  Whisk until light and frothy, and then carefully pour the custard over the top of the quiche.  Sprinkle with the Parmesan cheese (my secret for the nicely browned top that you see in the pictures.)   Transfer this to your preheated oven without spilling, haha.... not easy, and bake for nearly 55 minutes or until a tester comes out clean.  Today, my baking time was 53 minutes.

Try this, or one of my others from the blog, and let me know how you liked it.  I love comments, and would love to hear from you.  Thanks for stopping by!

Saturday, October 23, 2010

Cauliflower Quiche

Does the sound of cauliflower just not thrill or excite you very much? Give it a chance!  I decided to experiment tonight. I had a whole head of cauliflower in my refrigerator just begging to be used for something or throw it out!  Here's what I came up with:

CAULIFLOWER QUICHE
2 cups cauliflower florets, broken up into small florets
1/3 cup of sliced or slivered almonds
1 Tbs. butter
2 green onions, tops and greens sliced thinly
1 small clove garlic
2 cups of cheddar cheese
1/4 cup Asiago cheese OR Parmesan
3 eggs
1 1/2 cups of milk (try not to use skim in a quiche)
1 tsp salt
Freshly ground pepper to taste
1/4 tsp. of oregano
2 Tbs. flour
1 big spoonful Dijon mustard
1 nicely frozen, ready to use, why make your own, deep dish frozen pie crust!! lol


  • Steam the cauliflower florets in the microwave for about 4 minutes until soft. Drain well and set aside. 
  • Melt the butter and brown the almonds, remove them from the pan to a small dish and set aside.
  • Add a bit of olive oil to the same pan and saute the green onions and garlic for a minute or two to soften.


Assemble all of this on a baking sheet on your counter.

  • Using a pastry brush, spread about a Tbs. of Dijon mustard around the bottom and sides of the crust.
  • Layer the cauliflower in the bottom of the pan.
  • Top with your sauteed onion/garlic mixture, and then distribute the shredded cheddar over the vegetables.
  • Sprinkle half the toasted almonds over the top of the cheese.
  • Whisk together the 3 eggs, milk, salt and pepper, oregano, and flour and pour over the top.
  • Sprinkle with the Asiago or Parmesan and sprinkle with the remaining almonds.
Carry it over to your oven which has been preheating at 375 degrees. If some of the filling does not fit, don't stress.  Bake for about 55 minutes, maybe a few minutes less. The top will be beautifully browned, puffy, and delicious looking! I am serving this with a combination salad of romaine, fresh spinach, tomatoes and fresh blueberries with raspberry vinaigrette. But if blueberries are not in season, switch that out for diced pears or apple.


Have you tried my Broccoli and Swiss Cheese Quiche ???  It is delicious!  This recipe and a hundred pages of great recipes, stories and photos are included in my cookbook, "Singingirl Cooks!" It's for sale.  If you don't own a copy and would like to, ask me!
Very, very good!


Monday, August 9, 2010

Chili Cheese Mini-Bites

I've been making a lot of muffin/cupcake shaped things recently, Banana Ginger Snap Cupcakes and Carrot Coconut Cupcakes with Marmalade Buttercream Icing and today isn't any different. The major difference is that this recipe is a tasty little appetizer and not a full-blown, bag-your-diet sweet treat. I was thinking about that line from Julia Roberts' upcoming movie, "Eat, Pray, Love" where she says "leave no carb behind."  Very funny.  So in this recipe, I have left all carbs behind, and you and anyone else eating one can feel comfortable knowing you're eating a cheesy, spicy, veggie-filled little tidbit.  I'm mildly hooked on Cabot Hot Habanero Cheese these days, and I thought a combination of that plus the Seriously Sharp Cheddar would be a good combo.  They're great. Try them next time you're making appetizers.


CHILI CHEESE MINI-BITES 
1 Tbs. butter
3 green onions, thinly sliced
1 clove of garlic, minced
1 tomato, chopped (I used a Roma)
4 eggs, beaten
1/4 cup black olives, sliced (I used half a dozen)
2 oz. Cabot Hot Habanero Cheese
2 oz. Cabot Seriously Sharp Vermont Cheddar
1 tsp. chili powder
1/2 tsp. cumin
1/8 tsp. cayenne pepper
S&P to taste


  • Preheat the oven to 425 degrees and coat a mini muffin tin with cooking spray.
  • Melt the butter in a small pan and saute the onions, garlic and tomato until the onion is soft. Remove from heat and transfer this mixture to a medium sized mixing bowl. Allow to cool for a few minutes.
  • Shred both cheeses.
  • Beat the eggs and add them to the vegetable mixture along with the remaining ingredients.
  • Fill each mini muffin tin with a heaping Tablespoon of the mixture.
  • Bake for ten minutes.
  • Remove from oven, allow to sit for a minute, then run a knife around the edge of the cups and place on a serving dish.
  • Serve warm. These can be reheated easily. Or, serve cold like a quiche.
  • Makes a few less than two dozen, and only about 30 calories each, and a trace of carbs.

Peggy is always where the food is!

Saturday, August 7, 2010

Banana and Ginger Snap Cupcakes

You know what they say about bananas, don't you? Umm, I don't either. I do know that if you're patient but a few days after purchasing them practically green you will have beautifully overripe fruit just perfect for baking.  Plus I really wanted to try out my new decorating tool, and as you can see by the pictures I could use a little more practice. Though they weren't all perfect looking (but they weren't too shabby either for my first time), I promise you they taste awesome. I took almost, that's right, almost all of them to my mother's place today and gave them to the gals working there. They loved them! Using a tried and true banana cupcake recipe from Martha Stewart, I kicked it up a notch with the addition of ground ginger. Here's the simple recipe for these light, moist and delicious treats.


BANANA AND GINGER SNAP CUPCAKES
1 1/2 cups flour
3/4 cup sugar
1 tsp. baking powder
1/2 tsp. baking soda
1/4 tsp. salt
1/2 tsp. ground ginger
1/2 cup unsalted butter, melted and cooled
2 to 3 large ripe, thoroughly mashed bananas
2 eggs
1/2 tsp. vanilla

GINGER BUTTERCREAM FROSTING
1 1/2 cups powdered sugar
1/2 cup butter, very soft
1 1/2 tsp. milk
1/4 tsp. vanilla
1/2 tsp. ground ginger
1/4 cup crushed ginger snap cookies for the tops

Preheat the oven to 350 degrees and line a 12-cup muffin pan with regular sized paper or foil liners. In a mixing bowl, stir together the first six ingredients, the flour through the ginger. In another bowl, stir together well the butter, bananas, eggs and vanilla. Add all at once to the flour mixture and stir well. Divide the batter evenly between the 12 cupcake liners, approximately one-quarter cup of batter per cupcake. Bake for approximately 20 minutes, maybe a minute or two longer, until a toothpick comes out clean and dry. Remove immediately from pans to a wire rack and cool completely before frosting.

For the frosting, mix the sugar and butter together and add the milk, vanilla and ground ginger. You can always add more milk, so always start with less. Frost the cooled cupcakes simply or try your hand at decorating. Sprinkle the tops with the crushed ginger snap cookies. Enjoy!!!

I love comments. It makes me feel like I'm doing this for someone other than myself. If you stop by, and you have an extra second, say hi. Thanks!!!

Not too much, not too little....just perfect!

Friday, July 23, 2010

Carrot and Coconut Cupcakes with Marmalade Buttercream Icing


Why, you must think I've gone nuts making batches of mac and cheese and the like, for who? Just me? Seriously, I am NOT eating all of this stuff.  Like today, for instance, I wanted to bring something to my therapist who is helping me with my..... oh, you thought I was going to say my head, didn't you? She's an occupational therapist, a hand specialist, and she's helping me get the use back in my hand that had surgery in three different places.  I like to bring her things that show my appreciation. I'm bringing her cupcakes today!  Using ingredients I have on hand, I put together a basic cupcake recipe and added some of my favorite things to it, especially in the icing, orange marmalade....  Now, I got a little overly zealous dividing the mixture.  This recipe should really make a dozen cupcakes. But I had two things going against me.  Firstly, I had jumbo cupcake liners and secondly, I didn't want them to look skimpy so I added a little too much batter to each one.  I have more like 8 jumbo cupcakes instead of 10 to 12 regular cupcakes.  When you make them, buy regular sized cupcake liners and divide the batter accordingly.  Enjoy! And let me know if you try them, or if you'd like me to make them for you..... Ask me, I might!


CARROT AND COCONUT CUPCAKES 
WITH MARMALADE BUTTERCREAM ICING
1/2 cup dark brown sugar
3/4 tsp. baking soda
1 tsp. baking powder
1/2 tsp salt
1/2 tsp. cinnamon
1 cup finely chopped carrot
1 cup coconut
1/3 cup raisins
1/4 cup oil (not olive oil)
1/4 cup butter, melted
2 eggs
1 cup flour


  • Preheat the oven to 350 degrees.
  • I chop the carrots first in my food processor. If you have one, do the chopping in it. It produces a very small chop, perfect for the cupcake. If you don't own a processor, then chop away. Set aside.
  • In a large mixing bowl, stir together the first seven ingredients, the sugar through the raisins.
  • Using a hand mixer, beat in the oil and butter.
  • Continuing to use the mixer, add the eggs one at a time, beating well after each addition.
  • Lastly, add the flour and beat with the mixer for another minute or two. (like you would a cake mix).
  • Divide the mixture among at least 10 to twelve regular cupcake liners set in a muffin tin. Bake for approximately 20 minutes or until a toothpick comes out clean and dry. Remove from the muffin tin and cool on a rack completely before frosting.


MARMALADE BUTTERCREAM ICING
1/2 cup butter, softened
1/3 cup orange marmalade
1/2 tsp. vanilla
1 1/2 cups powdered sugar
1 to 2 tsp. milk
1/4 cup finely chopped pistachio nuts, optional

Very simply, cream the butter, marmalade and vanilla together. Sift the powdered sugar over the top and stir until starting to become incorporated. Add the milk a teaspoon at a time until the desired spreading consistency.  Wait until the cupcakes are completely cooled before frosting. If you like, sprinkle the tops of the frosted cupcakes with the chopped nuts.  Wow, enjoy!


Sunday, July 18, 2010

Deviled Salmon Cakes with Lemon Yogurt Sauce

My sister Joanna contributed this recipe to my cookbook "Singingirl Cooks!"  You certainly can find pretty much this same recipe in most internet searches. But I put a little twist on the original to kick it up just another notch. These are absolutely delicious, and the amazing thing is that it uses canned salmon.  Oh, I know. The groans and grossness of pulling apart that salmon in the can to remove bones, etc. It's really not that big a deal. But if you prefer you can buy a piece of salmon, poach or bake it, let it cool and then flake it yourself to make about two cups. So, here is the recipe. The slightly long list of ingredients and the little bit of prep time is well worth the effort. I found that when I did an inventory to see what I needed to buy, I already had everything except a tiny can of corn, a container of yogurt and the parsley.

DEVILED SALMON CAKES WITH LEMON YOGURT SAUCE
1 large can of salmon, drained and bones removed
1/2 cup finely chopped onion
1/2 cup finely chopped celery
1 small jalapeno pepper, seeded and finely chopped
1/2 cup corn, canned or frozen
Salt and pepper to taste
1/2 cup mayonnaise
1 Tbs. Dijon mustard
1 tsp. pickle relish
1 tsp. lemon juice
1/2 tsp. Worcestershire sauce
1/4 tsp. paprika
2 big dashes of hot sauce
1 egg
1/2 cup cracker crumbs
1 cup Panko breadcrumbs
2 Tbs. butter
2 Tbs. canola oil

Flake the salmon into a bowl. Add the onion, celery, jalapeno, corn, salt and pepper. Mix together and set aside.

In another bowl, combine the mayonnaise, egg, mustard, relish, lemon juice, Worcestershire, paprika and hot sauce. Fold these ingredients into the salmon mixture along with 1/2 cup of cracker crumbs. Place the Panko on a plate.

Form the salmon into cakes. You can make six larger ones or eight smaller. Carefully coat them with the Panko. I found that holding the salmon cake and patting the Panko on one side, then flipping it over in my hand and patting the crumbs on the other side worked better than laying the salmon cake in the dish, the reason being the salmon is soft and might tend not to keep its shape. Do whatever way works for you.

Refrigerate the cakes on a plate loosely covered with saran and chill for about an hour.

Melt the butter and oil in a large nonstick skillet over medium heat. With your spatula, lift each salmon cake off the plate and add to the pan. Cook half of them about four minutes or so on each side, pressing down gently on them once or twice with your spatula. Turn carefully and fry the other side four minutes or so or until nicely browned.

To serve, place a big spoonful of the lemon yogurt sauce on each plate and spread it out a bit with the back of your spoon. Top with a salmon cake and garnish with parsley and lemon slice.  Enjoy!!

LIGHT LEMON YOGURT SAUCE
1 cup of plain fat free yogurt
1 tsp. freshly grated lemon peel
1 Tbs. lemon juice
1/4 cup chopped parsley
OR 1/2 tsp. tarragon
Salt and pepper to taste

Mix all ingredients together and keep chilled until ready to serve.  You can easily double this recipe, and I suggest you do!

Tuesday, June 29, 2010

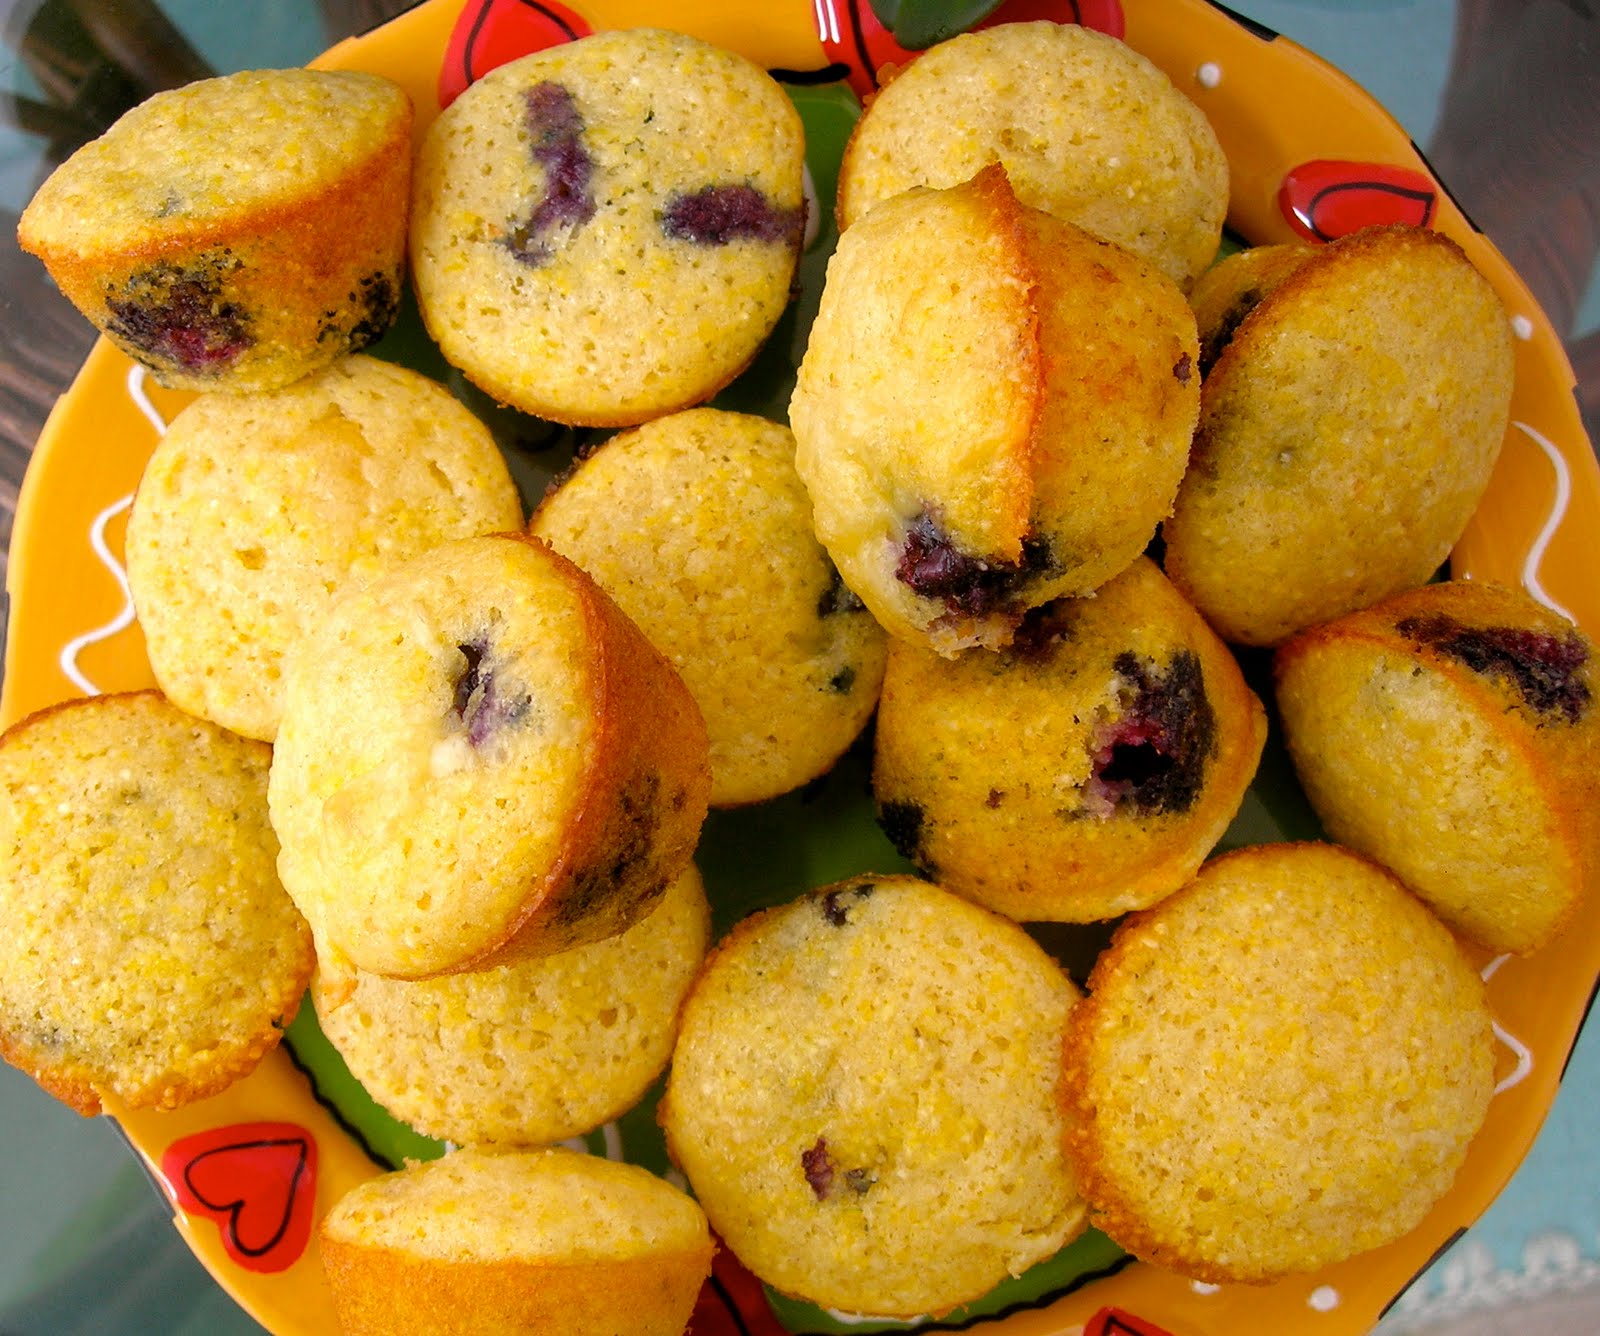
Blueberry and Cheddar Cornmeal Mini-Muffins

The temptation was there.  Blueberries, finally 2 for $3.00.  They have come down in price as far as they will probably go this season.  Not that I didn't pay more for them a few weeks ago to make that incredible Fresh Blueberry Pie.  You made it, didn't you? Well, I know some of you did.  Okay, here's my corn muffin recipe tweaked just a little bit to include blueberries and a little zip from some cheddar cheese. I used sharp white cheddar, but you can use the orange cheddar. This recipe calls for buttermilk, and I don't know about you but I never, repeat, never have buttermilk in the house. If you have a recipe that calls for buttermilk, like this one, measure 1 1/2 Tbs. of cider vinegar into a measuring cup and add milk to measure one cup.  Let it stand for a few minutes. It actually smells like buttermilk, and you will never notice the difference in your recipe. Of note, I only use this method for baking. If you're making a soup that calls for buttermilk, buy the real thing.


BLUEBERRY AND CHEDDAR CORNMEAL MINI-MUFFINS
1 stick of butter
2 eggs
1/2 cup sugar
1/2 tsp. baking soda
1/2 tsp. salt
1 cup buttermilk
1 cup coarse or medium yellow cornmeal
1 cup sifted flour
1/3 cup shredded sharp cheddar cheese
2/3 cup blueberries, rinsed and dried

Preheat your oven to 375 degrees. Melt the butter and pour into a large mixing bowl. Let it cool for a few minutes, and then add the two eggs, beating well. Stir in the sugar, baking soda, salt and buttermilk. Stir in the cornmeal, flour, and cheese.  Fold in the berries. Coat a mini muffin pan with cooking spray, and fill each mini-muffin cup with about a quarter of a cup of batter, making sure you've got at least two berries in each muffin.  The batter should come to the top of the cup for a nice full-sized muffin. Do not use paper liners.  Bake for about 13 to 14 minutes or until a toothpick comes out clean. Makes 30 mini muffins.  These muffins are so moist with the addition of the blueberries and cheese and the slightly crunchy texture of the cornmeal, you won't need butter. Just pop the damn thing in your mouth and get over it.


Sunday, March 28, 2010

Orange and Raisin French Toast

Yesterday was a busy day. We had a birthday in the house. So starting with a great breakfast and ending with a fun evening in downtown Delray Beach, with probably the most perfect weather day we've had in months, it was an all around great day.  Here's the recipe that I whipped up using Pepperidge Farms Raisin Swirl Bread.  It was buy one get one at the store a couple of weeks ago, so there was a surplus of raisin bread around.  It came in handy this morning. I usually recommend a thicker sliced bread, like a challah (or egg bread) for making french toast, but the thinner sliced raisin bread was delicious. You gotta try it!

ORANGE AND RAISIN FRENCH TOAST

Whisk Together:
4 eggs
2/3 cup of milk
3 Tbs. orange juice
Grated peel of half an orange
1 tsp. sugar
1/4 tsp. cinnamon
1/2 tsp. vanilla
pinch of salt


Place your slices of bread in a baking dish (13x9). Eight slices fit pretty okay but will overlap slightly. Pour the egg mixture over the bread, turn once, and allow them to soak up the mixture for a good few minutes, turning occasionally.

My tip for turning and getting them out of your baking dish in one piece is to use a spatula. If you use your hands, they're going to tear and fall apart. Use a spatula and save yourself the aggravation!

In a skillet, heat equal amounts of butter and vegetable oil, a spoonful or so of each. Fry four at a time if it's a large pan on medium to medium high heat until golden brown, a few minutes each side. Remove to a platter and cover with foil to keep warm. Add extra butter and oil for the next batch. This makes eight slices. 


Now I know I've made jokes about using a good old jar of Spice Islands orange peel or lemon peel in some of my recipes, but I gotta say that when you've got the real thing around it's so much better, and pretty easy to do.  That's what I did here. Tammi and Marvin were right, "Ain't Nothin' Like The Real Thing Baby...." 

Enjoy, and let me know how it turned out.

P.S.  This recipe and more than a hundred pages of other great recipes, stories and pictures can be found in my book Singingirl Cooks! If you don't own a copy and would like to, let me know.  Thanks!

Friday, February 12, 2010

Baked Birds Nests

How many different ways can we make this egg in toast thing, right? For years I've been tearing a small hole in the middle of a slice of bread, frying it in the pan, flipping it, etc.  Here is yet another remarkable way to prepare the incredible, edible egg. The really great thing about making them this way is that you can prepare several of them all at the same time, and everyone can have their eggs and eat them too, all at the same time.  Did I just use the phrase "all at the same time" twice in one sentence? Make these this weekend!! Okay, here is what you do:

Baked Birds Nests
Preheat the oven to 375 degrees. Decide how many you're going to make, usually two per person. Coat a muffin pan very well with cooking spray. Using soft wheat bread, trim the crust from the edges, and gently push each slice of bread into the muffin pan to create a cup. Melt a couple tablespoons of butter in the microwave and brush the edges and insides of the bread with a pastry brush. Or if you're tired this morning, just spray the edges of the bread with cooking spray, which works just as well.  Now, break one egg into each bread cup.  Bake for approximately 15 minutes or until done to your liking. They will look slightly opaque on top after 15 minutes but are really done at that point.

Remove the muffin pan from the oven. Slide a knife around the sides of the muffin pan to remove each piece. They will come out of the pan perfectly easily and have the beautiful little shape of a muffin. Serve and season with salt and pepper.

I've decided that a medium egg fits into the bread cup better than a large egg. It will work fine using the large but may overflow a bit, which doesn't really affect the overall outcome, and now that I'm talking about it, I'm wondering who buys medium eggs anyway, right?

Great Tip! The soft 40 calorie wheat bread works great and will keep you from feeling too guilty about the carb thing.

Thursday, February 4, 2010

Cheddar and Jalapeno Corn Muffins

The decision is final, at least for two of the items to serve on Superbowl Sunday.  Chili and Cornbread. But since I didn't have all the ingredients for the chili at this very moment, I decided to make the corn muffins and test them out instead. Oh, are they good!!! Here's the recipe....

CHEDDAR AND JALAPENO CORN MUFFINS
1 stick of butter
2 eggs
1/2 cup sugar
1/2 tsp. baking soda
1/2 tsp. salt
1 cup buttermilk
1 cup coarse or medium yellow cornmeal
1 cup flour
1/2 cup shredded sharp cheddar
2 Tbs. diced jalapenos (I buy a jar already to rock)

Melt the butter in the microwave in a large microwavable bowl. Let it cool for a few minutes, and then add the eggs, beating well. Stir in the sugar, baking soda, salt and buttermilk. (See my tip below for making a great substitute for buttermilk.)  Stir in the cornmeal, flour, cheese and jalapenos. Save a few sprinklings of cheese for the tops of the muffins.

Evenly distribute the batter among 12 muffin cups that have been coated with cooking spray. Don't use paper muffin liners. Sprinkle the tops with the remaining shredded cheese. Bake in a preheated 375 degree oven for about 20 to 23 minutes or until a toothpick comes out clean. Run a knife around the sides of the muffins to remove from pans and cool on a rack.

Great Tip: For recipes like this that call for buttermilk, and who has buttermilk just hanging around in their refrigerator, measure 1 1/2 Tbs. cider vinegar into a measuring cup and add enough milk to make 1 cup. Let this stand for a few minutes while you're preparing the muffins, and proceed with the recipe. It actually smells like buttermilk, and you will never notice the difference in your recipe. This method works well for things like these muffins. I have tried this with soup recipes that call for larger amounts of buttermilk and failed miserably!!! For soups and sauces that call for buttermilk, I would stick with the real thing, but for these muffins this substitution works beautifully!

Sunday, January 17, 2010

Broccoli and Swiss Cheese Quiche

This has been a rough month to say the least! Whadda way to start the new year with my mother in and out of hospitals and rehab. I think I have managed to cook twice this month, this quiche being one of those times.  One of the best things about making a quiche is that you probably have just about everything you need to throw one together at any time... that is, if you keep frozen pie crusts around, and of course I do. Remember what I said in my book, I like a break once in a while too! And really, those frozen pie crusts are pretty darn good.  Combined with a great salad, dinner's ready in no time. Okay, so on with the recipe:

BROCCOLI AND SWISS CHEESE QUICHE
Cover the bottom of a one frozen deep dish pie crust shell with 2 cups of grated Gruyere or any good swiss cheese. If you like, you can use part swiss and part cheddar, your choice. Set aside.

Saute in a Tbs. of olive oil 1 small finely chopped onion, 1/2 tsp. Italian seasoning or your favorite herb blend, S&P,  and about 1 1/2 cups of chopped broccoli, stems and florets, until soft. Spread over the cheese. Set aside.

Mix together in a blender or with a wire whisk:
4 eggs
1 1/2 cups of milk
3 Tbs. flour
1/4 tsp. salt
1/4 tsp. dry mustard OR Dijon mustard
1/2 tsp. hot sauce

Pour this mixture carefully over the cheese, onions and broccoli.  A little bit of the filling might not fit. Sprinkle with 1/2 cup of Parmesan cheese. Bake at 375 degrees for approximately 55 minutes. A knife should come out clean when tested.  The quiche will be beautiful, puffy and golden brown on top from all that Parmesan you put on top, but will deflate as it cools. Serve it hot out of the oven, or just warm, or have it cold for breakfast.... really good!

Tip: Place the pie crust on a cookie sheet before setting in the oven, and you'll avoid any unwanted spills.

You can view a previous blog entry from September of 2009 entitled Yummy Pictures From the Book Singingirl Cooks for a look at some of the dishes in my book, and of course you know it's for sale. Just ask me!

Thanks and see you next time!

Friday, December 25, 2009

Cranberry, Pistachio and Cardamom Oatmeal Cookies

Red and green spotted cookies. I was thinking Christmas, festive, attractive, soft, delish. I came up with this mix for oatmeal cookies, and guess what? You guessed. I snuck in the cardamom again. Oh, they ARE really good.  Unfortunately I have posted this after the fact, that being in time to put these colorful cookies on a platter for the guests. But I recommend you try these anytime, right now, tomorrow maybe, and feel good knowing the oats are in there to help lower your cholesterol, and the pistachios are one of the fewest calorie nuts you can eat! 


3/4 cup flour
1/2 teaspoon ground cardamom
1/2 teaspoon baking soda
1/2 teaspoon salt
1 cup quick cooking oats
1/2 cup dried cranberries
1/2 cup sugar
1/2 cup light  or dark brown sugar
1/2 cup shelled pistachios
1/2 cup (1 stick) unsalted butter, softened
2 teaspoons vanilla extract
1 egg


Preheat the oven to 350 degrees. Stir together the flour, cardamom, baking soda and salt and set aside. In another bowl, beat the butter and the sugars together. Stir in the vanilla and egg and mix well. Add the flour mixture all at once and stir to combine. Add the oats and mix again. Lastly, add the cranberries and pistachios which have been chopped, either by hand or in your food processor, leaving nice sized pieces of fruit and nut.


You can chill this mixture now until later, or start baking now.  


Spray a cookie sheet with cooking spray. Drop cookie dough by the tablespoon, 12 on a sheet, and bake for ten minutes. Remove to a rack to cool. Makes about 3 dozen. 

Thursday, December 17, 2009

Peanut Butter Cup Cookies

Could I eat just one of these cookies? I think not. That's why I made some of them with semi-sweet dark chocolate kisses.  I figured dark chocolate is good for you, right? So I feel half as guilty by having eaten one with dark chocolate and one with an unbelievably yummy Reese's miniature peanut butter cup. Oh, whoever came up with this idea, one thousand thank yous!!!  Now, I only changed the recipe up a bit, I can never leave well enough alone. I used a favorite peanut butter cookie recipe of mine, and rolled the dough in sugar before baking. That's all!  Get to the store and buy these ingredients and start baking. You'll be happy you did. I  don't want to get graphic, but I brought these to my hair salon, and the response was that these cookies rivaled a sexual experience.  S'all I'm sayin'.


PEANUT BUTTER CUP COOKIES
1/2 cup butter, room temperature
1/2 cup sugar
1/2 cup brown sugar
1/2 cup smooth peanut butter
1 egg
1/2 tsp. vanilla
1 1/4 cp. flour
3/4 tsp. baking soda
1/2 tsp. baking powder
1/4 tsp. salt
40 Reese's miniature peanut butter cups OR
half and half Reese's and Hershey's Kisses


Cream together the softened butter and sugars. Mix in the vanilla and peanut butter, then the egg. Mix together all the dry ingredients (flour through salt) and add all at once to the creamed mixture, mixing very well. Refrigerate for at least an hour, overnight if you want to do this at another time.


When ready to bake, preheat the oven to 375 degrees. Shape dough into balls about the size of a walnut, maybe a little smaller. Roll in a dish of granulated sugar and place each ball into an ungreased mini muffin pan. Bake for 8 to 8 1/2 minutes. Remove from oven and immediately place a peanut butter cup into the center of the cookie cup, pressing down gently so the candy is flush with the height of the cookie cup. Allow to cool in the mini muffin pan for a few minutes, and they will come out of the pan much easier. You can give them a nudge by sliding a knife carefully around the outside of the cookie to help it out, but you shouldn't have any problem. If you're using Hershey's Kisses, follow the same instructions for placing the candy into the cookie cup. This recipe makes around three dozen, give or take a few. 


Big Tip Here! Unwrap the candies and place them in the freezer while preparing the dough. It makes a big difference to have the candy be slightly or completely frozen before placing on the hot cookie. 

I thought twice about posting a picture with this reeeealllly old mini muffin pan, but I couldn't bring myself to PhotoShop out the worst of it right now, and I wanted you to see what the cookies looked like in the pan. If anyone wants to send me a new mini muffin pan, I'll give you my address ;-)


Monday, September 14, 2009

Sesame & Panko Crusted Tofu with Toasted Coconut & Pineapple Rice

This dinner idea came to me in bits and pieces. I had all the ingredients but wasn't quite sure how I wanted to put them together. The tofu I bought several days ago. It was calling to me to please do something with it or throw it out. This is what I came up with.... And I should start by saying, please give tofu a try! It's soy, it's good for you, it's high in protein, it's low in cholesterol, low in carbs, economical, a great alternative to meat,  it goes well with everything, just like that neutral shade of lipstick you have. (I'm talkin' to the girls now....)

THE MARINADE:
1 pkg. extra firm tofu, drained and blotted dry. I wrap the whole block of tofu in paper towels and press it until most of the packaging liquid is removed from it.
2 green onions, finely chopped
Fresh ginger, 1 inch finely chopped (use powdered if you don't have fresh, to taste, probably 1/4 tsp.)
1 clove garlic, finely chopped
Sesame oil, 2 Tbs.
1 8 oz. can pineapple chunks. Open the can, drain into a cup, and use half the juice for this marinade. The other half of the juice you will use for cooking the rice (below). The pineapple chunks you'll use in the rice also.
1 tsp. salt
Ground black pepper

Cut the tofu into five slices. Cut each slice in half the long way, then cut it into 4 pieces. You should wind up with about 40 pieces of tofu. (In other words, you should get 8 chunks from one slice of tofu.) Throw those into a large zip-lock bag and add the above marinade ingredients. Refrigerate.

THE CRUST MIXTURE:
Using three bowls, place a couple handfuls of flour in one, 1 egg plus a little water in another bowl, and in the third bowl place 1 cup of Panko breadcrumbs, 2 Tbs. toasted sesame seeds, salt and pepper to taste. I buy the sesame seeds and toast them myself in a dry pan for a few minutes until browned.

Get some canola or another light oil hot in a pan, not olive oil. Place half the tofu chunks into the flour, stir to coat, shake off the excess flour. Then place the pieces into the egg/water mixture and stir to coat, then drop them into the third bowl of Panko/sesame seeds/salt and pepper. Fry on medium to medium-high heat, turning until nicely browned. Remove to paper towels to drain.  Repeat the process with the other half of the tofu, adding a little more oil to the pan if necessary. They turn out crispy on the outside, soft in the middle and just downright excellent.

THE RICE: 
Brown or white rice, you'll need 1 cup of raw, whichever you choose
1/4 cup or more of coconut, toasted in your toaster oven for a few minutes until nicely browned.
Pineapple chunks (from the can that you opened for the juice in the marinade)

I used brown rice. I made 2 cups of it, using mostly water and the rest of the pineapple juice to measure 2 cups of liquid for 1 cup of uncooked rice, and I added a few drops of sesame oil. Cook according to the package directions.

When the rice is done, remove it from the heat and stir in the pineapple chunks and the toasted coconut, reserving a sprinkle to garnish the entire plate. I chopped the chunks of pineapple smaller too.

You are ready to plate!  I am serving this with a simple saute of the three vegetables that I had on hand, but it certainly was a good choice; red pepper, yellow pepper, zucchini, a clove of garlic, salt and pepper. The combination of those vegetables was delicious, but you can use whatever you like or have on hand.

Listen kids, I know this sounds like a lot of work. It was. Nothing that a cocktail won't smooth out :-) The whole process was really NOT that serious. And the end result was well worth a bit of effort. If you just can't handle the thought of tofu, then there'll be no convincing you otherwise. For the rest of you, please try the recipe and then let me know what you think. If nothing else,  just leave me a note and let me know you stopped by.