Friday, December 25, 2009

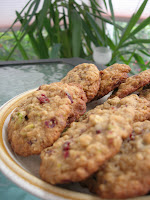
Cranberry, Pistachio and Cardamom Oatmeal Cookies

Red and green spotted cookies. I was thinking Christmas, festive, attractive, soft, delish. I came up with this mix for oatmeal cookies, and guess what? You guessed. I snuck in the cardamom again. Oh, they ARE really good.  Unfortunately I have posted this after the fact, that being in time to put these colorful cookies on a platter for the guests. But I recommend you try these anytime, right now, tomorrow maybe, and feel good knowing the oats are in there to help lower your cholesterol, and the pistachios are one of the fewest calorie nuts you can eat! 


3/4 cup flour
1/2 teaspoon ground cardamom
1/2 teaspoon baking soda
1/2 teaspoon salt
1 cup quick cooking oats
1/2 cup dried cranberries
1/2 cup sugar
1/2 cup light  or dark brown sugar
1/2 cup shelled pistachios
1/2 cup (1 stick) unsalted butter, softened
2 teaspoons vanilla extract
1 egg


Preheat the oven to 350 degrees. Stir together the flour, cardamom, baking soda and salt and set aside. In another bowl, beat the butter and the sugars together. Stir in the vanilla and egg and mix well. Add the flour mixture all at once and stir to combine. Add the oats and mix again. Lastly, add the cranberries and pistachios which have been chopped, either by hand or in your food processor, leaving nice sized pieces of fruit and nut.


You can chill this mixture now until later, or start baking now.  


Spray a cookie sheet with cooking spray. Drop cookie dough by the tablespoon, 12 on a sheet, and bake for ten minutes. Remove to a rack to cool. Makes about 3 dozen. 

Thursday, December 17, 2009

Peanut Butter Cup Cookies

Could I eat just one of these cookies? I think not. That's why I made some of them with semi-sweet dark chocolate kisses.  I figured dark chocolate is good for you, right? So I feel half as guilty by having eaten one with dark chocolate and one with an unbelievably yummy Reese's miniature peanut butter cup. Oh, whoever came up with this idea, one thousand thank yous!!!  Now, I only changed the recipe up a bit, I can never leave well enough alone. I used a favorite peanut butter cookie recipe of mine, and rolled the dough in sugar before baking. That's all!  Get to the store and buy these ingredients and start baking. You'll be happy you did. I  don't want to get graphic, but I brought these to my hair salon, and the response was that these cookies rivaled a sexual experience.  S'all I'm sayin'.


PEANUT BUTTER CUP COOKIES
1/2 cup butter, room temperature
1/2 cup sugar
1/2 cup brown sugar
1/2 cup smooth peanut butter
1 egg
1/2 tsp. vanilla
1 1/4 cp. flour
3/4 tsp. baking soda
1/2 tsp. baking powder
1/4 tsp. salt
40 Reese's miniature peanut butter cups OR
half and half Reese's and Hershey's Kisses


Cream together the softened butter and sugars. Mix in the vanilla and peanut butter, then the egg. Mix together all the dry ingredients (flour through salt) and add all at once to the creamed mixture, mixing very well. Refrigerate for at least an hour, overnight if you want to do this at another time.


When ready to bake, preheat the oven to 375 degrees. Shape dough into balls about the size of a walnut, maybe a little smaller. Roll in a dish of granulated sugar and place each ball into an ungreased mini muffin pan. Bake for 8 to 8 1/2 minutes. Remove from oven and immediately place a peanut butter cup into the center of the cookie cup, pressing down gently so the candy is flush with the height of the cookie cup. Allow to cool in the mini muffin pan for a few minutes, and they will come out of the pan much easier. You can give them a nudge by sliding a knife carefully around the outside of the cookie to help it out, but you shouldn't have any problem. If you're using Hershey's Kisses, follow the same instructions for placing the candy into the cookie cup. This recipe makes around three dozen, give or take a few. 


Big Tip Here! Unwrap the candies and place them in the freezer while preparing the dough. It makes a big difference to have the candy be slightly or completely frozen before placing on the hot cookie. 

I thought twice about posting a picture with this reeeealllly old mini muffin pan, but I couldn't bring myself to PhotoShop out the worst of it right now, and I wanted you to see what the cookies looked like in the pan. If anyone wants to send me a new mini muffin pan, I'll give you my address ;-)


Friday, December 4, 2009

Candied Cardamom and Orange Mixed Nuts

I've got a great new recipe for your nut dish this holiday season. Don't buy Planters or any other kind of store bought nuts this time. Get yourself some oversized bags of nuts at Costco or Sam's Club or whichever store of that type is popular in your area, and make your own! Perfect for gift giving, if you can manage to put any aside before devouring them all yourself. And great news.... I've found yet another use for that expensive jar of cardamom that I bought a while back!  These are sweet, crunchy and downright addictive.

CANDIED CARDAMOM 
AND ORANGE MIXED NUTS


1/4 cup butter
1/2 cup plus 3 Tbs. sugar, divided
1 cup unsalted pecans
1 cup unsalted walnuts
1 cup unsalted almonds
2 tsp. cardamom
1/2 tsp. or more orange peel       

Melt the butter in a large pan over medium high heat. Add the 1/2 cup of sugar and stir until the sugar is completely dissolved. Meanwhile, mix the remaining 3 Tbs. of sugar with the cardamom and orange peel and set aside. As you can see, I took the easy way out and used a jar of Spice Islands orange peel. But if you like grating, by all means grate away! When the sugar is dissolved, still over the medium to medium high heat add the 3 cups of nuts, cooking and stirring for about 5 minutes until toasted and well coated with the butter/sugar mixture. Don't allow the nuts to burn. Pour the nuts into a large bowl and add the reserved sugar and spice mixture. Stir well to coat evenly.  Dump this mixture onto a foil lined cookie sheet and break apart with the back of your spoon or spatula to, well, to break them apart.... duh me.  When they are cooled, they will separate, yeah, that's the word I was looking for... they will separate easily and be ready to fill a nut dish or add to a container for gift giving. Yum.... wait till you taste these!


Saturday, November 14, 2009

Apple Cranberry Streusel Pie

I am never going to become famous posting to this blog once a month. Of course, I wasn't thinking about becoming famous at blogging at all. There are hundreds, no thousands, of really good food and recipe blogs out there. Nonetheless, here is another entry being humbly offered for your reading and eating enjoyment. It's a delicious twist on the great old standby - apple pie. I think I mentioned once or twice how I am trying to use that expensive jar of cardamom that I bought.  Okay, I threw some in this recipe for good measure, plus a few other ingredients to make this pie one that tastes as awesome as it looks. Try it, and please leave a comment for me to let me know you stopped by.

STREUSEL TOPPING
1/2 cup brown sugar
1/2 cup flour
1/2 cup chopped walnuts
4 Tbs. cold butter

PIE FILLING
1/3 cup white sugar
2 Tbs. flour
1 tsp. cinnamon
1/4 tsp. cardamom
2 tsp. lemon juice
1/3 cup dried cranberries
8 or 9 apples (2 1/2" small size)

1 frozen deep dish pie crust shell
1 Tbs. butter

Prepare the streusel topping by combining the brown sugar, flour, walnuts and butter. Use a pastry cutter or your hands to mix the streusel into a crumbly mixture. Set aside.

Peel and thinly slice the apples. Place in a large bowl and add the white sugar, flour, cinnamon, cardamom, lemon juice and cranberries. Stir to coat evenly. Pour this mixture into the deep dish pie crust, packing it down a bit as you go.  Listen, if you want to make your own crust, knock your socks off. I just love those frozen crusts! Mound the mixture higher in the middle. Top evenly with the streusel, packing it down well. Dot with the Tbs. of butter. Place on a baking sheet and bake in a 350 degree preheated oven for about 50 to 55 minutes. Remove to a rack and let it cool before slicing.

This recipe is not part of the not so famous "Singingirl Cooks!" cookbook.  If you are interested in knowing more about owning the book, please let me know and I'll tell you how easy it is to make that happen!


Wednesday, October 7, 2009

Deb's Stuffed Pepper Soup

I've been waiting a while to do this post. This delicious soup recipe comes from my oldest and best friend, Debbie Finegan, who passed away on September 16th after a long and courageous battle with cancer. She would be beaming from ear to ear to know that her recipe is being published for all the world to see. (Well, seeing as hardly anyone looks at this blog, that previous statement is a bit of an exaggeration.) But I imagine that would make Debbie laugh even harder.

This soup tastes just like a stuffed pepper, only better and much easier to make! I'm thinking it's right on time for the cool weather that many of you are experiencing up north. So go out and get the simple ingredients to make this soup, and even if you never met this amazing person, send a little smile her way, up that-a-way, for I'm sure that's where she is with all the other angels.

DEB’S STUFFED PEPPER SOUP
2 lbs. ground sirloin
1 28 oz. can tomato sauce
1 28 oz. can diced tomatoes (undrained)
2 cups chopped green pepper
2 beef bouillon cubes
¼ cup brown sugar
2 tsp. salt
1 tsp. pepper
3 cups water (more or less depending on how thick you like it)
2 cups cooked rice

Brown the ground sirloin and drain. Add the remaining ingredients and bring everything to a boil except the rice. Reduce heat; cover and simmer for 30 to 40 minutes or until peppers are tender. Add cooked rice last. Makes a big pot, plenty for the next day.

In loving memory
Debbie Farr Finegan 8/19/1951 - 9/16/2009

Monday, September 14, 2009

Sesame & Panko Crusted Tofu with Toasted Coconut & Pineapple Rice

This dinner idea came to me in bits and pieces. I had all the ingredients but wasn't quite sure how I wanted to put them together. The tofu I bought several days ago. It was calling to me to please do something with it or throw it out. This is what I came up with.... And I should start by saying, please give tofu a try! It's soy, it's good for you, it's high in protein, it's low in cholesterol, low in carbs, economical, a great alternative to meat,  it goes well with everything, just like that neutral shade of lipstick you have. (I'm talkin' to the girls now....)

THE MARINADE:
1 pkg. extra firm tofu, drained and blotted dry. I wrap the whole block of tofu in paper towels and press it until most of the packaging liquid is removed from it.
2 green onions, finely chopped
Fresh ginger, 1 inch finely chopped (use powdered if you don't have fresh, to taste, probably 1/4 tsp.)
1 clove garlic, finely chopped
Sesame oil, 2 Tbs.
1 8 oz. can pineapple chunks. Open the can, drain into a cup, and use half the juice for this marinade. The other half of the juice you will use for cooking the rice (below). The pineapple chunks you'll use in the rice also.
1 tsp. salt
Ground black pepper

Cut the tofu into five slices. Cut each slice in half the long way, then cut it into 4 pieces. You should wind up with about 40 pieces of tofu. (In other words, you should get 8 chunks from one slice of tofu.) Throw those into a large zip-lock bag and add the above marinade ingredients. Refrigerate.

THE CRUST MIXTURE:
Using three bowls, place a couple handfuls of flour in one, 1 egg plus a little water in another bowl, and in the third bowl place 1 cup of Panko breadcrumbs, 2 Tbs. toasted sesame seeds, salt and pepper to taste. I buy the sesame seeds and toast them myself in a dry pan for a few minutes until browned.

Get some canola or another light oil hot in a pan, not olive oil. Place half the tofu chunks into the flour, stir to coat, shake off the excess flour. Then place the pieces into the egg/water mixture and stir to coat, then drop them into the third bowl of Panko/sesame seeds/salt and pepper. Fry on medium to medium-high heat, turning until nicely browned. Remove to paper towels to drain.  Repeat the process with the other half of the tofu, adding a little more oil to the pan if necessary. They turn out crispy on the outside, soft in the middle and just downright excellent.

THE RICE: 
Brown or white rice, you'll need 1 cup of raw, whichever you choose
1/4 cup or more of coconut, toasted in your toaster oven for a few minutes until nicely browned.
Pineapple chunks (from the can that you opened for the juice in the marinade)

I used brown rice. I made 2 cups of it, using mostly water and the rest of the pineapple juice to measure 2 cups of liquid for 1 cup of uncooked rice, and I added a few drops of sesame oil. Cook according to the package directions.

When the rice is done, remove it from the heat and stir in the pineapple chunks and the toasted coconut, reserving a sprinkle to garnish the entire plate. I chopped the chunks of pineapple smaller too.

You are ready to plate!  I am serving this with a simple saute of the three vegetables that I had on hand, but it certainly was a good choice; red pepper, yellow pepper, zucchini, a clove of garlic, salt and pepper. The combination of those vegetables was delicious, but you can use whatever you like or have on hand.

Listen kids, I know this sounds like a lot of work. It was. Nothing that a cocktail won't smooth out :-) The whole process was really NOT that serious. And the end result was well worth a bit of effort. If you just can't handle the thought of tofu, then there'll be no convincing you otherwise. For the rest of you, please try the recipe and then let me know what you think. If nothing else,  just leave me a note and let me know you stopped by.
Saturday, September 12, 2009

Yummy Pictures From The Book "Singingirl Cooks"

I've been experimenting today. I wanted to see if I could put into one post a collection of pictures of some of the dishes from my cookbook, "Singingirl Cooks". I think I succeeded. This is so exciting. I'm mildly technically challenged with the computer. But this is as close as I've come to doing something amazing.... well, besides cooking all these amazing looking dishes. So many of you already have the book. Wait, did I hear you say you don't have a copy yet? Doesn't this stuff look great, like something you could make, like something you want to make? Leave me a comment and let me know if you're interested, and I'll tell you more about it and how you can have a copy for yourself.

Monday, September 7, 2009

Cardamom and Orange Butter Cookies

Would my Aunt Rose be upset about me changing her recipe for Orange Butter Cookies ever so slightly? I hope not. I've been thinking of ways to use that jar of cardamom ever since I spent a fortune on it last week. I decided I was going to make something Indian inspired last weekend, got my grocery list together for Melon Curry and Coconut Chicken Fingers, both of which you can see at my gal-pal's site, www.raisin-toast.com. I nearly croaked when I saw the price of that jar of Spice Islands cardamom. Damn, it was expensive! I bought it anyway. Now I understand it would have been better to buy the pods and grind it myself. Oh well, live and learn. I have a feeling, anyway, that if I put that in my recipe, you know, the pods and the grinding and all that, my friends and family would ask me if I've gone totally mad to think they would consider cracking pods open and grinding the contents by hand.

So, okay. I've got the ground cardamom, and I have added it to my dear Aunt Rose's old, very old, cookie recipe. They turned out awesome. Here's the recipe. Enjoy.

1 cup butter, softened
1 cup sugar
2 eggs
Juice of 1 large orange (approximately 2 ounces)
3 cups flour
3 tsp. baking powder
1/4 tsp. salt
Heaping 1/4 tsp. ground cardamom

Cream together the butter and sugar. Add eggs, one at a time, beating well after each addition. Add orange juice and mix well. Set aside.

Sift together the flour, baking powder, salt, and cardamom. Add gradually to the butter mixture until everything is incorporated.

Refrigerate for at least an hour. You could make it at night and bake the next morning if you wanted to.

Preheat the oven to 350 degrees and set the oven rack in the middle of the oven. Just dust the baking sheet with flour. Roll big heaping teaspoons of cookie dough into a ball and place on the cookie sheet, 9 or 10 cookies at a time, don't crowd. Dust the bottom of a glass with flour and give the cookies a tap to slightly flatten. They'll turn out beautiful that way. You can just drop them from the spoon too if you don't want to roll them in a ball and flatten them. They'll be more irregularly shaped,  the picture shows the cookies both ways. You decide how you like them. Bake on the middle shelf for approximately 13 to 15 minutes or until golden brown on the bottom. They will still be light on top. Remove to a rack to cool. Makes about 3 dozen.


When cooled completely, make a mixture of a few spoonfuls of apricot preserves thinned with a few drops or so of orange juice. Brush this over the cooled cookies as a glaze. You can top this with finely crushed walnuts also. Or, make a simple chocolate glaze with confectioners sugar, cocoa and milk until drizzling consistency. These cookies can be frozen and decorated at the time you are going to serve them. They are equally delicious plain, and now even more exciting with the addition of cardamom!! (Of course, the original recipe did not call for cardamom, so if you just don't want to spring for the jar, make them without. Aunt Rose did.

One final thought about cardamom.... In an attempt to find ways to use my expensive spice, I'm putting a few good size dashes in my coffee grounds in the morning for coffee that tastes awesome. It's like chai coffee!! And I will use it again, I will. I will....

This recipe, along with over 120 pages of recipes, pictures and stories is part of my cookbook, "Singingirl Cooks!" available for purchase. Ask me about it.  Thanks!